Number 5: deploying Che 7 behind a firewall (air gap environment) using
Deploying Che 7 with custom images
Unlike Deploying Che 7 to Minishift 1.34+, this doc will explain how to do an Eclipse Che 7 deployment with a custom resource yaml file to override the images used in the deployment.
This process can be used for many things, but in this example it’ll be in support of an air gap environment, where an organization cannot directly see Quay or Red Hat Container Catalog, and must instead reference internally mirrored artifacts within their organization’s firewall.
Prerequisites
Fetch them like this (or similar):
cd ~/bin
curl -sSL https://github.com/che-incubator/chectl/releases/download/20190724230954/chectl-linux -o chectl
chmod +x chectl
cd /tmp
curl -sSL https://github.com/minishift/minishift/releases/download/v1.34.1/minishift-1.34.1-linux-amd64.tgz -o minishift.tgz
tar xvzf minishift.tgz
mv minishift*/minishift ~/bin/
chmod +x ~/bin/minishift
Fetch them like this (or similar):
cd ~/bin
curl -sSL https://github.com/che-incubator/chectl/releases/download/20190724230954/chectl-linux -o chectl
chmod +x chectlcd /tmp
curl -sSL https://github.com/minishift/minishift/releases/download/v1.34.1/minishift-1.34.1-linux-amd64.tgz -o minishift.tgz
tar xvzf minishift.tgz
mv minishift*/minishift ~/bin/
chmod +x ~/bin/minishiftProcedure
-
Start up minishift. (See Start up Minishift for some suggested default settings.)
minishift start
-
Log in once startup is complete.
oc login 192.168.MY.IP:8433 -u system -p admin
-
For Eclipse Che 7, pull these images and publish them to your internal registry:
-
eclipse/che-server:nightly
-
eclipse/che-keycloak:nightly
-
quay.io/eclipse/che-devfile-registry:nightly
-
quay.io/eclipse/che-plugin-registry:nightly
-
centos/postgresql-96-centos7:latest
-
registry.access.redhat.com/ubi8-minimal:8.0
-
Create a custom resource file, which overrides the default image values from che-operator defaults.go to use your custom registry’s images.
NOTE
To watch the events and verify which images are pulled, see this post before performing the next step.
-
Deploy Che to minishift using the custom resource file created above. In this example the namespace
che-op is used instead of the default che:
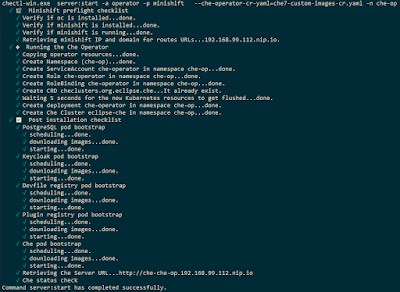
chectl server:start -a operator -p minishift \
  --che-operator-cr-yaml=che7-custom-resource-airgap.yaml -n che-op
NOTE
If you use the minishift addon to deploy Che (which uses a deployment configuration instead of an operator), your custom resource file will not be used. The addon is deprecated.
-
You should see this:
-
Once deployed, you should see these in your Minishift console:

-
The custom image reference can be seen in the yaml for the deployment:

- Start up minishift. (See Start up Minishift for some suggested default settings.)
minishift start - Log in once startup is complete.
oc login 192.168.MY.IP:8433 -u system -p admin - For Eclipse Che 7, pull these images and publish them to your internal registry:
- eclipse/che-server:nightly
- eclipse/che-keycloak:nightly
- quay.io/eclipse/che-devfile-registry:nightly
- quay.io/eclipse/che-plugin-registry:nightly
- centos/postgresql-96-centos7:latest
- registry.access.redhat.com/ubi8-minimal:8.0
- Create a custom resource file, which overrides the default image values from che-operator defaults.go to use your custom registry’s images.NOTETo watch the events and verify which images are pulled, see this post before performing the next step.
- Deploy Che to minishift using the custom resource file created above. In this example the namespace
che-opis used instead of the defaultche:chectl server:start -a operator -p minishift \ --che-operator-cr-yaml=che7-custom-resource-airgap.yaml -n che-opNOTEIf you use the minishift addon to deploy Che (which uses a deployment configuration instead of an operator), your custom resource file will not be used. The addon is deprecated. - You should see this:
- Once deployed, you should see these in your Minishift console:
- The custom image reference can be seen in the yaml for the deployment:


